Monday, 11 March 2019

Introduction - Hibernate Configuration File

<?xml version="1.0" encoding="UTF-8"?>
<!DOCTYPE hibernate-configuration PUBLIC  
          "-//Hibernate/Hibernate Configuration DTD 5.3//EN"  
          "http://hibernate.sourceforge.net/hibernate-configuration-5.3.dtd">

<hibernate-configuration>
<session-factory>  
        <property name="hbm2ddl.auto">update</property>  
        <property name="dialect">org.hibernate.dialect.MySQL5Dialect</property>  
        <property name="connection.url">jdbc:mysql://localhost:3306/bs</property>  
        <property name="connection.username">root</property>  
        <property name="connection.password">7901</property>  
        <property name="connection.driver_class">com.mysql.cj.jdbc.Driver</property>  
    <property name="show_sql">true</property>
    <mapping resource="Student.hbm.xml"/> 
    </session-factory>  
</hibernate-configuration> 

=======================================================================
More About Configuration File:

Line #1. 
<?xml version="1.0" encoding="UTF-8"?> : This line shows the document type and version.
Most of xml files start with this line.

Line #2.
<!DOCTYPE hibernate-configuration PUBLIC  
          "-//Hibernate/Hibernate Configuration DTD 5.3//EN"  
          "http://hibernate.sourceforge.net/hibernate-configuration-5.3.dtd">:
The DTD in the hibernate jar is a good way to know what are the attributes that can be included and the expected name for that tag.

Note: DTD is vary HB version to version.

Line #6.
<hibernate-configuration>: Each configuration file start by this tag.
Note: ONLY one configuration file is enough for per project.
We can configure more than one DB connection by single configuration file.

Line #7.
<session-factory> : For each DB configure we need ONE session-factory.
If we configure HB application by two DB then we need two <session-factory> tags.

Line #8.
<property name="hbm2ddl.auto">update</property>: This lines performs auto DDL opeartion.
We will discuss later about this line.
This is optional if we don't use then we before run the program we have to create DB Tables manually.

Line #9.
<property name="dialect">org.hibernate.dialect.MySQL5Dialect</property>: 
hibernate.dialect property makes Hibernate to generate the appropriate SQL statements for the chosen database. Dialect is the SQL dialect that your database uses. Hibernate uses "dialect" configuration to know which database you are using so that it can convert hibernate query to database specific query.

For MySQL-5 or Lower version:
org.hibernate.dialect.MySQL5Dialect

Above For MySQL-5:
org.hibernate.dialect.MySQL8Dialect

For Oracle Database:
org.hibernate.dialect.OracleDialect

Line #10.
<property name="connection.url">jdbc:mysql://localhost:3306/bs</property>  : This lines defines the URL for the Database:

For mysql:
jdbc:mysql://localhost:3306/bs      Note: bs is database name, so you can change accordingly

For Oracle:
jdbc:oracle:thin:@localhost:1521:xe   Note: it is for TYPE-IV driver


Line #11.
<property name="connection.username">root</property> : User name of your database.

Line #12.
<property name="connection.password">7901</property> : Password of the database.

Line #13.
<property name="connection.driver_class">com.mysql.cj.jdbc.Driver</property>  : Path of your driver class.
Note: Please check the driver PATH in your Database jar files:
MOSTLY:
For mysql5 or lower version:
com.mysql.jdbc.Driver

For Oracle:
oracle.jdbc.driver.OracleDriver

Line #14.
<property name="show_sql">true</property> : It is optional. If we used this line then it show the sql commands on the console that Hibernate internally used.

Line #15.
<mapping resource="Student.hbm.xml"/> : It is used to add the mapping file.
We can add many mapping files for example:
<mapping resource="Student.hbm.xml"/>
<mapping resource="Employee.hbm.xml"/>
<mapping resource="Phone.hbm.xml"/>


Hibernate First Application Using Mapping File

Hibernate First Application Using Mapping File

Steps to create Hibernate First Application:
===================================================
1. Create Dynamic Web Project
2. Add HB Jars in lib folder
3. Create Bean/POJO class
4. Create Hibernate Configuration File
5. Create Mapping File
6. Create Test class for test the functionality


1. Create Dynamic Web Project

2. Add HB Jars in lib folder:
-> Download all the jars file https://drive.google.com/file/d/1LRzOK-L6hDRip3LJcDw112pZUA5qft6d/view?usp=sharing
--> Extract all jars files
--> Copy all jars files
--> Paste in lib folder

NOTE - Also add the DATABASE Jars (According to DB what you are using)

After paste lib folder will look like this:

3. Create package 
goto ->Java Resource->src. Then right click on src folder:

4. In my case I create package name "bean" - You can take any package name (But it should be valid)

5. Create bean class

package bean;

public class Student {
private int roll;
private String name;
private String course;
private float fees;
private String contact;
public Student(int roll, String name, String course, float fees) {
this.roll=roll;
this.name=name;
this.course=course;
this.fees=fees;
}
public Student(int roll, String name, String course, float fees, String conact) {
this(roll, name, course, fees);
this.contact=contact;
}
public String getContact() {
return contact;
}
public void setContact(String contact) {
this.contact = contact;
}
public Student() {}
public int getRoll() {
return roll;
}
public void setRoll(int roll) {
this.roll = roll;
}
public String getName() {
return name;
}
public void setName(String name) {
this.name = name;
}
public String getCourse() {
return course;
}
public void setCourse(String course) {
this.course = course;
}
public float getFees() {
return fees;
}
public void setFees(float fees) {
this.fees = fees;
}
}


6. Create Hibernate Configuration File:
Path - You can save configuration file anywhere in the project but I would recommended to save in src folder by "hibernate.cfg.xml" name.


<?xml version="1.0" encoding="UTF-8"?>
<!DOCTYPE hibernate-configuration PUBLIC  
          "-//Hibernate/Hibernate Configuration DTD 5.3//EN"  
          "http://hibernate.sourceforge.net/hibernate-configuration-5.3.dtd">

<hibernate-configuration>
<session-factory>  
        <property name="hbm2ddl.auto">update</property>  
        <property name="dialect">org.hibernate.dialect.MySQL5Dialect</property>  
        <property name="connection.url">jdbc:mysql://localhost:3306/bs</property>  
        <property name="connection.username">root</property>  
        <property name="connection.password">7901</property>  
        <property name="connection.driver_class">com.mysql.cj.jdbc.Driver</property>  
    <property name="show_sql">true</property>
    <mapping resource="Student.hbm.xml"/> 
    </session-factory>  
</hibernate-configuration>  
 
NOTE - We will discuss more about configuration file in next blog.

7. Create Mapping File
Path - You can save mapping file anywhere in the project but I would recommended to save in src folder by "Bean_Class_Name.hbm.xml" name.

<?xml version="1.0" encoding="UTF-8"?>
<!DOCTYPE hibernate-mapping PUBLIC  
 "-//Hibernate/Hibernate Mapping DTD 5.3//EN"  
 "http://hibernate.sourceforge.net/hibernate-mapping-5.3.dtd"> 
<hibernate-mapping>
<class name="bean.Student" table="studentdb2">  
    <id name="roll" column="s_roll">
    <generator class="assigned"/>
    </id> 
            
    <property name="name"/>  
    <property name="course"/>  
        <property name="fees"/>
        <property name="contact"/>  
  </class>  
</hibernate-mapping>


NOTE - We will discuss more about mapping file in next blog.


7. Create Test class - to test the functionality

package test; //Make sure you will create test package 

import org.hibernate.Session;
import org.hibernate.SessionFactory;
import org.hibernate.Transaction;
import org.hibernate.cfg.Configuration;

import bean.Student;

public class Test {

public static void main(String[] args) {
//1. create Configuration class object
Configuration cfg = new Configuration();
//2. config the configuration file
cfg.configure("hibernate.cfg.xml");
//3. create SessionFactory object
SessionFactory sf=cfg.buildSessionFactory();
//4. Create Session Object
Session ses=sf.openSession();
//4. if you wand to DDL operation the we need to start the TX
Transaction tx=ses.beginTransaction();
Student st=new Student();
st.setCourse("BCA");
st.setName("Bhupender");
st.setRoll(7904);
st.setFees(23000);
st.setContact("9891297115");
ses.persist(st);
tx.commit();
ses.close();
try {
Thread.sleep(20*1000);
}
catch(Exception e) {}
sf.close();
System.out.println("Inserted!!!");
}

}

8. Run the file

After run you will see record will insert in the database table.


Hibernate Jars File

Download Hibernate 5 Jars File by below link;

https://drive.google.com/file/d/1LRzOK-L6hDRip3LJcDw112pZUA5qft6d/view?usp=sharing

What is Hibernate - Hibernate Introduction


In this tutorial am going to explain, why Hibernate came into picture though we have JDBC for connecting to the database, and what is this hibernate frame work first let us see what are the draw backs of JDBC


Draw Backs of JDBC:

  • In JDBC, if we open a database connection we need to write in try, and if any exceptions occurred catch block will takers about it, and finally used to close the connections.
  • here as a programmer we must close the connection, or we may get a chance to get our of connections message…!
  • Actually if we didn’t close the connection in the finally block, then jdbc doesn’t responsible to close that connection.
  • In JDBC we need to write Sql commands in various places, after the program has created if the table structure is modified then the JDBC program doesn’t work, again we need to modify and compile and re-deploy required, which is tedious.
  • JDBC used to generate database related error codes if an exception will occurs, but java programmers are unknown about this error codes right.
  • In the Enterprise applications, the data flow with in an application from class to class will be in the form of objects, but while storing data finally in a database using JDBC then that object will be converted into text.  Because JDBC doesn’t transfer objects directly.
In order to overcome above problems,  Hibernate came into picture..!


What is Hibernate:

Hibernate is the ORM tool given to transfer the data between a java (object) application and a database (Relational) in the form of the objects.  Hibernate is the open source light weight tool given by Gavin King.
Hibernate is a non-invasive framework,  means it wont forces the programmers to extend/implement any class/interface, and in hibernate we have all POJO classes so its light weight.
Hibernate can runs with in or with out server, i mean it will suitable for all types of java applications (stand alone or desktop or any servlets bla bla.)
Hibernate is purely for persistence (to store/retrieve data from Database).

Friday, 23 June 2017

Introduction to Filter API

Filters are compontents that you can use and configure to perform some filtering tasks. Filter is used for pre-processing of requests and post-processing of responses. You can have any number of filters for pre-processing of a request and post-processing of a response. Filters are configured in the deployment descriptor of a web application.


How Filters Works?

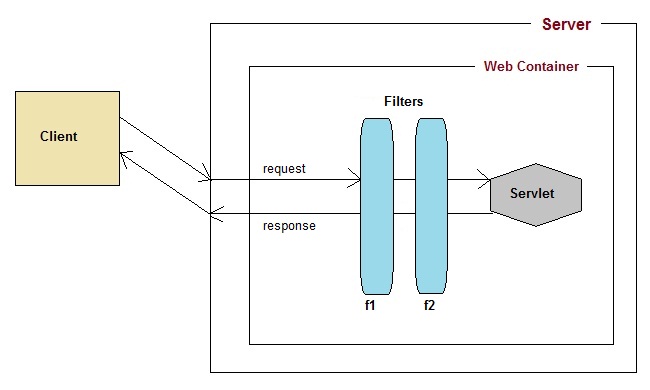
  • When a request reaches the Web Container, it checks if any filter has URL patterns that matches the requested URL.
  • The Web Container locates the first filter with a matching URL pattern and filter's code is executed.
  • If another filter has a matching URL pattern, its code is then executed. This continues until there are no filters with matching URL patterns left.
  • If no error occurs, the request passes to the target servlet. Hence we know, that the request will be passed to the target servlet only when all the related Filters are successfully executed.
  • The servlet returns the response back to its caller. The last filter that was applied to the request is the first filter applied to the response.
  • At last the response will be passed to the Web Container which passes it to the client.

More about Filter API

Filter API is part of Servlet API. Filter interface is found in the javax.servlet package.
For creating a filter, we must implement Filter interface. Filter interface gives the following life cycle methods for a filter:
  1. void init(FilterConfig filterConfig): invoked by the web container to indicate to a filter that it is being placed into service.
  2. void doFilter(ServletRequest request, ServletResponse response, FilterChain chain): invoked by the container each time a request/response pair is passed through the chain due to a client request for a resource at the end of the chain.
  3. void destroy(): invoked by the web container to indicate to a filter that it is being taken out of service.

What is FilterChain Interface?

FilterChain object is used to invoke the next filter in the chain, or if the calling filter is the last filter in the chain then the rosource at the end of the chain invoked. The resources at the end of Filter chain can either be a target Servlet(in case of request flow) or the Client(in case of response flow) as described in the diagram above.

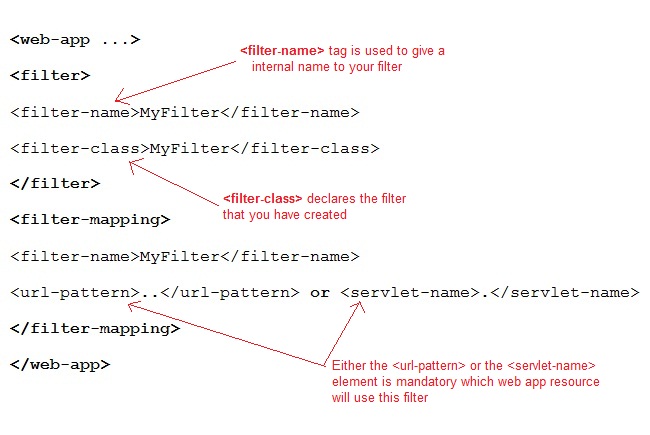
Declaring a Filter inside Deployment Descriptor


Example demonstrating Filter usage

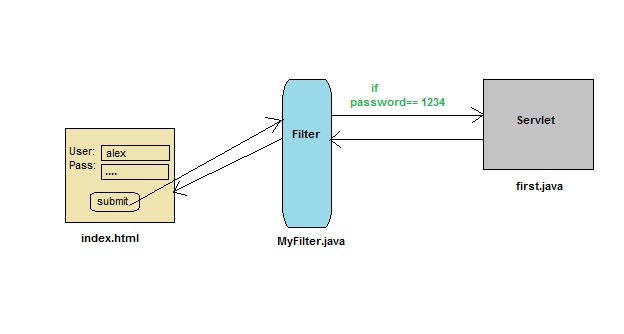
In this example we are using Filter to authenticate(check correct username and password). Here index.html will ask username and password from the user, MyFilter will validate the password entered by the user, if the user has entered "1234" as password, then he will be forwarded to first servlet else the index.html will be shown again to the user.
This is exactly what we used to do earlier using two servlet classes earlier, one for validation and the other to Welcome the user. Now we will insert a Filter for validating the user.

index.html
<form method="post" action="first">
    Name:<input type="text" name="user" /><br/>
    Password:<input type="text" name="pass" /><br/>
    <input type="submit" value="submit" />
</form>

web.xml
<web-app..>
    <filter>
        <filter-name>MyFilter</filter-name>
        <filter-class>MyFilter</filter-class>
    </filter>
    <filter-mapping>
        <filter-name>MyFilter</filter-name>
        <servlet-name>first</servlet-name>
    </filter-mapping>
    <servlet>
        <servlet-name>first</servlet-name>
        <servlet-class>first</servlet-class>
    </servlet>
    <servlet-mapping>
        <servlet-name>first</servlet-name>
        <url-pattern>/first</url-pattern>
    </servlet-mapping>
    <welcome-file-list>
        <welcome-file>index.html</welcome-file>
    </welcome-file-list>
</web-app>

MyFilter.java
import java.io.*;
import javax.servlet.*;
import javax.servlet.http.*;

public class MyFilter implements Filter {
 
    public void init(FilterConfig fc) throws ServletException {}
    
    public void doFilter(ServletRequest request, ServletResponse response,
            FilterChain chain) throws IOException, ServletException {
        PrintWriter out = response.getWriter();
        String pass = request.getParameter("pass");
        if(pass.equals("1234"))
        {
         chain.doFilter(request, response);   
        }
        else
        {
            out.println("You have enter a wrong password");
            RequestDispatcher rs = request.getRequestDispatcher("index.html");
            rs.include(request, response);
        }
    }
   public void destroy() { }
}

first.java
import java.io.*;
import javax.servlet.*;
import javax.servlet.http.*;

public class first extends HttpServlet {

    protected void doPost(HttpServletRequest request, HttpServletResponse response)
            throws ServletException, IOException 
     {
        response.setContentType("text/html;charset=UTF-8");
        PrintWriter out = response.getWriter();
        String user = request.getParameter("user");
        out.println("Wellcome "+user);
     }
}

ServletRequestEvent and ServletRequestListener

ServletRequestEvent and ServletRequestListener

ServletRequestEvent class gives notification about lifecycle events for a ServletRequest. The source of the event is the ServletContext of the web application. ServletRequestListener receives the notifications generated by ServletRequestEvent and performs some specified tasks based on them.

Some Importants Methods of ServletRequestListener

MethodsDescription
void requestDestroyed(ServletRequestEvent e)is invoked when request is about to go out of scope of the web application..
void requestInitialized(ServletRequestEvent e)is invoked when request is about to come into scope of the web application.

Example


Hence one can easily implement the ServletRequestListener Interface and provide definitions to the two methods provided by it, requestDestroyed() and requestInitialized().
As the name suggests these methods will be called when request is initialized and when it is destroyed, hence we can use them for various purposes, like variable cleanup when request is destroyed, or performing some initial checks when request is received etc.

HttpSessionEvent and HttpSessionListener

HttpSessionEvent and HttpSessionListener

HttpSessionEvent class gives notifications for changes to sessions within a web application. HttpSessionListener receives notifications of changes to the list of active sessions in a web application and perform some action. HttpSessionListener is used to perform some important tasks when a session is created or destroyed. For example: counting the number of active session.

Some other Session related Listeners

ListenerDescription
HttpSessionActivationListenerLet's you know when a session moves from one Virtual machine to another.
HttpSessionBindingListenerLe's your attribute class object get notified when they are added or removed from session.
HttpSessionAttributeListenerLet's you know when any attribute is added, removed or replaced in a session.

Methods of HttpSessionListener

MethodsDescription
void sessionCreated(HttpSessionEvent e)notification that a session was created.
void sessionDestroyed(HttpSessioEvent e)notification that a session was destroyed.

Example of HttpSessionListener

In this example we will create a session listener that will count the number of active sessions in a web application.

MySessionCounter.java
import javax.servlet.http.*;

public class MySessionCounter implements HttpSessionListener {

    private static int sessionCount; 
    
    public int getActiveSession()
    {
        return sessionCount;
    }
   
    public void sessionCreated(HttpSessionEvent e) 
    {   
        sessionCount++;  
    }

    public void sessionDestroyed(HttpSessionEvent e) 
    {
        sessionCount--;
    }
}

web.xml
<web-app ...>
<listener>
       <listener-class>MySessionCounter</listener-class>
</listener>
</web-app>

Access attributes in component

NOTE: To access an attribute in a  component , use expressions as  {! v.<Attribute Name>} . ----------------------------------------...