Friday, 23 June 2017

What is ServletRequestAttributeEvent

What is ServletRequestAttributeEvent?

ServletRequestAttributeEvent class gives notifications about changes to the attributes of ServletRequestin an application.
This class listens to the notifications and performs some important tasks whenever there is any change to the request attribute.

Some Important Methods of ServletRequestAttributeListener

MethodsDescription
void attributeAdded(ServletRequestAttributeEvent e)notification that a new attribute was added to the servlet request.
void attributeRemoved(ServletRequestAttributeEvent e)notification that an existing attribute was removed from the servlet request.
void attributeReplaced(ServletRequestAttributeEvent e)notification that an attribute was replaced on the servlet request

What is ServletContextAttributeEvent?

ServletContextAttributeEvent class let's you know if an attribute in a web application context has been added, removed or replaced.
Implementation of ServletContextAttributeListener interface, receive notifications of changes to the attribute list on the servlet context of a web application.

Some Important Methods of ServletContextAttributeListener

MethodsDescription
void attributeAdded(ServletContextAttributeEvent e)notification that a new attribute was added to the context.
void attributeRemoved(ServletContextAttributeEvent e)notification that an existing attribute was removed from the context.
void attributeReplaced(ServletContextAttributeEvent e)notification that an attribute was replaced on the context

ServletContextEvent and ServletContextListener

ServletContextEvent and ServletContextListener?

ServletContextEvent class gives notifications about changes to the servlet context of a web application. ServletContextListener receives the notifications about changes to the servlet context and perform some action. ServletContextListener is used to perform important task at the time when context is initialized and destroyed. In short, ServletContextEvent and ServletContextListener works in pair, whenever Servlet COntext changes, ServletContextEvent publishes a notification which is received by ServletContextListener and then, based on that certain tasks are performed by it.

Methods of ServletContextListener Interface

MethodsDescription
void contextDestroyed(ServletContextEvent e)is invoked when the application is destroyed.
void contextInitialized(ServletContextEvent e)is invoked when the application is initialized.

Making and Using a context listener

Context listener is not a servlet or JSP, it's a class that implements ServletContextListener interface and provides definition of contextDestroyed() and contextInitialized().


Example demontrating usage of ServletContextListener


index.html
<a href="Counter">Total Page views</a>

web.xml


For this example we will have to create a table named counter with a column named pageview to save the number of pageviews.
MyListener.java
import java.sql.*;
import javax.servlet.*;

public class MyListener implements ServletContextListener
{
    ServletContext ctx;
    Connection con;
    Statement s;
    PreparedStatement ps;
    ResultSet rs;
    int count;
    
    public void contextInitialized(ServletContextEvent sce) {
    
     try{
        Class.forName("com.mysql.jdbc.Driver");
       con= DriverManager.
               getConnection("jdbc:mysql://localhost:3306/test","user","password");

      s=con.createStatement();
      
      //fetching pageviews value from table counter
      rs=s.executeQuery("select pageview from counter");
        while(rs.next())
        {
            count=rs.getInt(1);
        }
       
       ctx=sce.getServletContext();
       ctx.setAttribute("pcount", count);
      }
      catch(Exception e){ e.printStackTrace(); }  
    }

    public void contextDestroyed(ServletContextEvent sce) {
   
     try
     {
       ctx=sce.getServletContext();
       count=(Integer)ctx.getAttribute("pcount");
       ps=con.prepareStatement("update counter set pcount='"+count+"'");
       ps.executeUpdate(); 
     } 
     catch(Exception e){ e.printStackTrace(); }
    }   
}

Counter.java
import java.io.*;
import javax.servlet.*;
import javax.servlet.http.*;

public class Counter extends HttpServlet {
   
    protected void doGet(HttpServletRequest request, HttpServletResponse response)
            throws ServletException, IOException {
        response.setContentType("text/html;charset=UTF-8");
        PrintWriter out = response.getWriter();
        ServletContext ctx = getServletContext();
        Integer count = (Integer)ctx.getAttribute("pcount");
        out.println(count+": pageview");
        ctx.setAttribute("pcount", ++count);      
    }
}

Using Hidden Form Field for Session Management

Using Hidden Form Field for Session Management

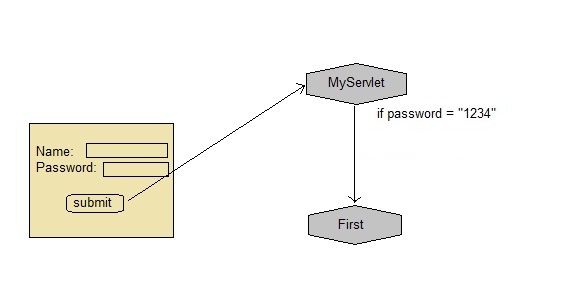
Hidden form field can also be used to store session information for a particular client. In case of hidden form field a hidden field is used to store client state. In this case user information is stored in hidden field value and retrieved from another servlet.

Advantages :

  • Does not have to depend on browser whether the cookie is disabled or not.
  • Inserting a simple HTML Input field of type hidden is required. Hence, its easier to implement.

Disadvantage :

  • Extra form submission is required on every page. This is a big overhead.

Example demonstrating usage of Hidden Form Field for Session


Below mentioned files are required for the example:

index.html
<form method="post" action="validate">
  Name:<input type="text" name="user" /><br/>
  Password:<input type="text" name="pass" ><br/>
  <input type="submit" value="submit">
</form>

web.xml
<web-app...>
    
    <servlet>
        <servlet-name>First</servlet-name>
        <servlet-class>First</servlet-class>
    </servlet> 
    <servlet-mapping>
        <servlet-name>First</servlet-name>
        <url-pattern>/First</url-pattern>
    </servlet-mapping>
    
    <servlet>
        <servlet-name>Second</servlet-name>
        <servlet-class>Second</servlet-class>
    </servlet>
    <servlet-mapping>
        <servlet-name>Second</servlet-name>
        <url-pattern>/Second</url-pattern>
    </servlet-mapping>
    
    <welcome-file-list>
        <welcome-file>index.html</welcome-file>
    </welcome-file-list>
    
</web-app>

First.java
import java.io.*;
import javax.servlet.*;
import javax.servlet.http.*;

public class First extends HttpServlet {

  protected void doPost(HttpServletRequest request, HttpServletResponse response)
            throws ServletException, IOException {
        response.setContentType("text/html;charset=UTF-8");
        PrintWriter out = response.getWriter();
        
 //getting value submitted in form from HTML file
        String user = request.getParameter("user");
        
        //creating a new hidden form field
        out.println("<form action='Second'>");
        out.println("<input type='hidden' name='user' value='"+user+"'>");
        out.println("<input type='submit' value='submit' >");
        out.println("</form>");
    }
}

Second.java
import java.io.*;
import javax.servlet.*;
import javax.servlet.http.*;

public class Second extends HttpServlet {

  protected void doGet(HttpServletRequest request, HttpServletResponse response)
            throws ServletException, IOException {
        response.setContentType("text/html;charset=UTF-8");
        PrintWriter out = response.getWriter();
        
        //getting parameter from the hidden field
        String user = request.getParameter("user");
        out.println("Welcome "+user);
    }
}

Like we created a hidden field in First Servlet, populated the value of user, and sent it to the Second Servlet, now Second servlet also has the user information. Similarly we will have to keep sending this information, wherever we need this, using hidden fields.

Using URL Rewriting for Session Management

Using URL Rewriting for Session Management

If the client has disabled cookies in the browser then session management using cookie wont work. In that case URL Rewriting can be used as a backup. URL rewriting will always work.
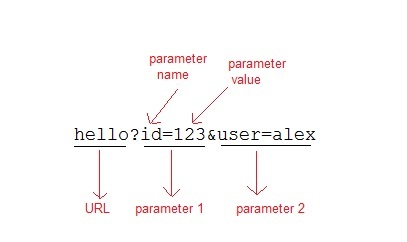
In URL rewriting, a token(parameter) is added at the end of the URL. The token consist of name/value pair seperated by an equal(=) sign.
For Example:


When the User clicks on the URL having parameters, the request goes to the Web Container with extra bit of information at the end of URL. The Web Container will fetch the extra part of the requested URL and use it for session management.
The getParameter() method is used to get the parameter value at the server side.

Example demonstrating usage of URL rewriting

Below mentioned files are required for the example:

index.html
<form method="post" action="validate">
  Name:<input type="text" name="user" /><br/>
  Password:<input type="text" name="pass" ><br/>
  <input type="submit" value="submit">
</form>

web.xml
<web-app...>
    
    <servlet>
        <servlet-name>validate</servlet-name>
        <servlet-class>MyServlet</servlet-class>
    </servlet> 
    <servlet-mapping>
        <servlet-name>validate</servlet-name>
        <url-pattern>/validate</url-pattern>
    </servlet-mapping>
    
    <servlet>
        <servlet-name>First</servlet-name>
        <servlet-class>First</servlet-class>
    </servlet>
    <servlet-mapping>
        <servlet-name>First</servlet-name>
        <url-pattern>/First</url-pattern>
    </servlet-mapping>
    
    <welcome-file-list>
        <welcome-file>index.html</welcome-file>
    </welcome-file-list>
    
</web-app>

MyServlet.java
import java.io.*;
import javax.servlet.*;
import javax.servlet.http.*;

public class MyServlet extends HttpServlet {

  protected void doPost(HttpServletRequest request, HttpServletResponse response)
            throws ServletException, IOException {
        response.setContentType("text/html;charset=UTF-8");
        String name = request.getParameter("user");
        String pass = request.getParameter("pass");
        
        if(pass.equals("1234"))
        {
            response.sendRedirect("First?user_name="+name+"");
        }
    }   
}

First.java
import java.io.*;
import javax.servlet.*;
import javax.servlet.http.*;

public class First extends HttpServlet {

  protected void doGet(HttpServletRequest request, HttpServletResponse response)
            throws ServletException, IOException {
        response.setContentType("text/html;charset=UTF-8");
        PrintWriter out = response.getWriter();
        String user = request.getParameter("user_name");
        out.println("Welcome "+user);
    }
}

Using Cookies for Session Management

Using Cookies for Session Management

Cookies are small pieces of information that are sent in response from the web server to the client. Cookies are the simplest technique used for storing client state.
Cookies are stored on client's computer. They have a lifespan and are destroyed by the client browser at the end of that lifespan.
Using Cookies for storing client state has one shortcoming though, if the client has turned of COokie saving settings in his browser then, client state can never be saved because the browser will not allow the application to store cookies.

Cookies API

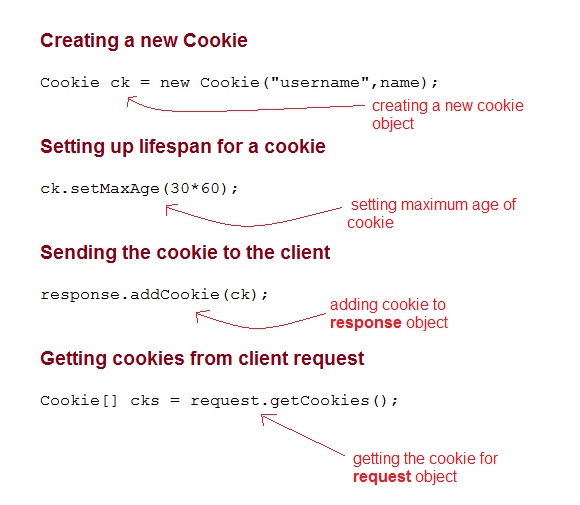
Cookies are created using Cookie class present in Servlet API. Cookies are added to response object using the addCookie() method. This method sends cookie information over the HTTP response stream. getCookies() method is used to access the cookies that are added to response object.


Example demonstrating usage of Cookies


Below mentioned files are required for the example:

index.html
<form method="post" action="validate">
  Name:<input type="text" name="user" /><br/>
  Password:<input type="text" name="pass" ><br/>
  <input type="submit" value="submit">
</form>

web.xml
<web-app...>
    
    <servlet>
        <servlet-name>validate</servlet-name>
        <servlet-class>MyServlet</servlet-class>
    </servlet> 
    <servlet-mapping>
        <servlet-name>validate</servlet-name>
        <url-pattern>/validate</url-pattern>
    </servlet-mapping>
    
    <servlet>
        <servlet-name>First</servlet-name>
        <servlet-class>First</servlet-class>
    </servlet>
    <servlet-mapping>
        <servlet-name>First</servlet-name>
        <url-pattern>/First</url-pattern>
    </servlet-mapping>
    
    <welcome-file-list>
        <welcome-file>index.html</welcome-file>
    </welcome-file-list>
    
</web-app>

MyServlet.java
import java.io.*;
import javax.servlet.*;
import javax.servlet.http.*;

public class MyServlet extends HttpServlet {

  protected void doPost(HttpServletRequest request, HttpServletResponse response)
            throws ServletException, IOException {
        response.setContentType("text/html;charset=UTF-8");
        String name = request.getParameter("user");
        String pass = request.getParameter("pass");
        
        if(pass.equals("1234"))
        {
            Cookie ck = new Cookie("username",name);
            response.addCookie(ck);
            response.sendRedirect("First");
        }
    }
}

First.java
import java.io.*;
import javax.servlet.*;
import javax.servlet.http.*;

public class First extends HttpServlet {

  protected void doGet(HttpServletRequest request, HttpServletResponse response)
            throws ServletException, IOException {
        response.setContentType("text/html;charset=UTF-8");
        PrintWriter out = response.getWriter();
        Cookie[] cks = request.getCookies();
        out.println("Welcome "+cks[0].getValue());
    }
}

What is HttpSession

What is HttpSession?

HttpSession object is used to store entire session with a specific client. We can store, retrieve and remove attribute from HttpSession object. Any servlet can have access to HttpSession object throughout the getSession() method of the HttpServletRequest object.

How HttpSession works


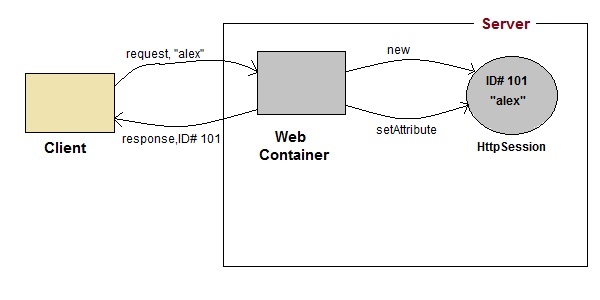
  1. On client's first request, the Web Container generates a unique session ID and gives it back to the client with response. This is a temporary session created by web container.
  2. The client sends back the session ID with each request. Making it easier for the web container to identify where the request is coming from.
  3. The Web Container uses this ID, finds the matching session with the ID and associates the session with the request.

HttpSession Interface


Some Important Methods of HttpSession

MethodsDescription
long getCreationTime()returns the time when the session was created, measured in milliseconds since midnight January 1, 1970 GMT.
String getId()returns a string containing the unique identifier assigned to the session.
long getLastAccessedTime()returns the last time the client sent a request associated with the session
int getMaxInactiveInterval()returns the maximum time interval, in seconds.
void invalidate()destroy the session
boolean isNew()returns true if the session is new else false
void setMaxInactiveInterval(int interval)Specifies the time, in seconds,after servlet container will invalidate the session.

Complete Example demonstrating usage of HttpSession

All the files mentioned below are required for the example.
index.html
<form method="post" action="Validate">
  User: <input type="text" name="user" /><br/>
  Password: <input type="text" name="pass" ><br/>
  <input type="submit" value="submit">
</form>

web.xml
<web-app..>
    
    <servlet>
        <servlet-name>Validate</servlet-name>
        <servlet-class>Validate</servlet-class>
    </servlet>
    <servlet>
        <servlet-name>Welcome</servlet-name>
        <servlet-class>Welcome</servlet-class>
    </servlet>
   
    <servlet-mapping>
        <servlet-name>Validate</servlet-name>
        <url-pattern>/Validate</url-pattern>
    </servlet-mapping>
    <servlet-mapping>
        <servlet-name>Welcome</servlet-name>
        <url-pattern>/Welcome</url-pattern>
    </servlet-mapping>
    
    <welcome-file-list>
        <welcome-file>index.html</welcome-file>
    </welcome-file-list>
    
</web-app>

Validate.java
import java.io.*;
import javax.servlet.*;
import javax.servlet.http.*;

public class Validate extends HttpServlet {

    protected void doPost(HttpServletRequest request, HttpServletResponse response)
            throws ServletException, IOException {
        response.setContentType("text/html;charset=UTF-8");
        
        String name = request.getParameter("user");
        String pass = request.getParameter("pass");
        
        if(pass.equals("1234"))
        {
            //creating a session
            HttpSession session = request.getSession();
            session.setAttribute("user", name);
            response.sendRedirect("Welcome");
        }
    }
}

Welcome.java
import java.io.*;
import javax.servlet.*;
import javax.servlet.http.*;

public class Welcome extends HttpServlet {
 
    protected void doGet(HttpServletRequest request, HttpServletResponse response)
            throws ServletException, IOException {
        response.setContentType("text/html;charset=UTF-8");
        PrintWriter out = response.getWriter();
        HttpSession session = request.getSession();
        String user = (String)session.getAttribute("user");
        out.println("Hello "+user);
    }
}

Managing Session in Servlets

Managing Session in Servlets

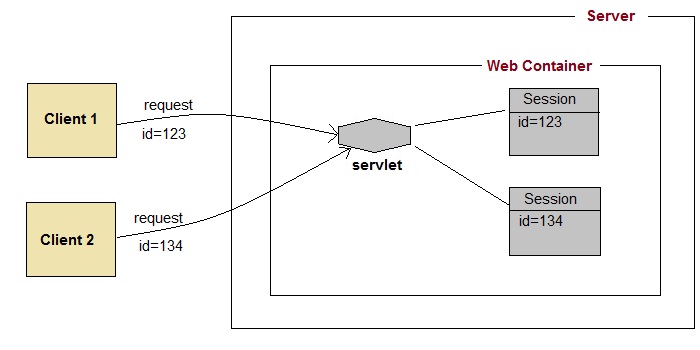
We all know that HTTP is a stateless protocol. All requests and responses are independent. But sometimes you need to keep track of client's activity across multiple requests. For eg. When a User logs into your website, not matter on which web page he visits after logging in, his credentials will be with the server, until he logs out. So this is managed by creating a session.
Session Management is a mechanism used by the Web container to store session information for a particular user. There are four different techniques used by Servlet application for session management. They are as follows:
  1. Cookies
  2. Hidden form field
  3. URL Rewriting
  4. HttpSession
Session is used to store everything that we can get from the client from all the requests the client makes.


The basic concept behind session is, whenever a user starts using our application, we can save a unique identification information about him, in an object which is available throughout the application, until its destroyed. So wherever the user goes, we will always have his information and we can always manage which user is doing what. Whenever a user wants to exit from your application, destroy the object with his information.

Access attributes in component

NOTE: To access an attribute in a  component , use expressions as  {! v.<Attribute Name>} . ----------------------------------------...